
Blog

If you’re a beginner in the world of electrical diagnostics, the thought of troubleshooting electrical systems may seem intimidating. However, with some basic knowledge and a little bit of practice, you can quickly gain confidence in diagnosing electrical issues. In this comprehensive guide, we’ll cover the essential concepts of electrical diagnostics, including common electrical problems and how to diagnose them. 1 Understanding Electrical Circuits Before you can begin diagnosing electrical problems, it’s essential to understand the basics of electrical circuits. An electrical circuit consists of four main components: a power source, a load, a switch, and conductors. The power source is the origin of the electrical current, such as a battery or alternator. The load is what the electrical current powers, such as a light bulb or motor. The switch controls the flow of the electrical current, and the conductors are the wires that connect everything. 2 Common Electrical Problems The most common electrical problems include: Dead Battery: A dead battery occurs when the battery can no longer hold a charge, resulting in the inability to start the engine or operate electrical systems. Loose or Corroded Battery Connections: Loose or corroded battery connections can lead to intermittent or no electrical power to the vehicle. Blown Fuses: A blown fuse occurs when the electrical circuit draws too much power, causing the fuse to burn out and interrupting the electrical circuit. Bad Alternator: A bad alternator can cause the battery to drain and prevent the electrical system from functioning correctly. Broken or Damaged Wires: Broken or damaged wires can cause electrical circuits to fail or malfunction, leading to intermittent or no power to the vehicle. 3 Diagnosing Electrical Problems To diagnose electrical problems, you’ll need some basic tools, including a multimeter, a test light, and a wiring diagram for your vehicle. The first step is to identify the electrical problem by testing the battery, alternator, and fuses. Once you’ve identified the problem, you can then use the wiring diagram to trace the electrical circuit and identify any broken or damaged wires. 4 Call in a Professional While some electrical problems are simple to diagnose and fix, others may require the expertise of a professional. If you’re unsure about diagnosing electrical problems, it’s always best to call in a professional to avoid causing further damage. In conclusion, understanding the basics of electrical diagnostics is essential for any beginner in the world of auto repair. By familiarizing yourself with the components of an electrical circuit and common electrical problems, you’ll be well on your way to diagnosing and fixing electrical issues in your vehicle. If you have more questions about electrical diagnostics or need assistance with diagnosing electrical problems, give us a call today at Chester River. Our team of professionals is here to help you keep your vehicle running smoothly.
Auto Repair! A wheel bearing is a critical component of your car’s suspension system. It is responsible for supporting the weight of your vehicle and allowing the wheels to rotate smoothly. However, like all car parts, wheel bearings will eventually wear out and need to be replaced. Knowing the cost of replacing a wheel bearing is important to budget for any future repairs. The cost of replacing a wheel bearing can vary depending on the make and model of your vehicle, as well as the type of bearing you choose. A basic wheel bearing replacement can cost anywhere from $100 to $300 per bearing, while a premium bearing can cost up to $500 or more. Additionally, the labor cost for installing a wheel bearing can range from $100 to $300, depending on the type of car and the complexity of the job. If you are experiencing symptoms of a failing wheel bearing, such as a loud humming or grinding noise while driving, it is important to have it inspected and replaced as soon as possible. Delaying repairs can result in further damage to the bearing, the wheel, and other components, increasing the overall cost of the repair. When choosing a wheel bearing, it is important to consider the type of driving you do and the conditions in which you drive. A premium bearing may offer a longer lifespan and better performance, but it may not be necessary if you drive only short distances in good weather. On the other hand, if you drive frequently in inclement weather or over rough roads, a premium bearing may be worth the extra investment. In conclusion, the cost of replacing a wheel bearing can range from a few hundred dollars to over a thousand dollars, depending on the make and model of your vehicle, the type of bearing you choose, and the labor cost for installation. It is important to budget for this repair and have any symptoms of a failing wheel bearing inspected as soon as possible to avoid further damage and increased repair costs. If you have more questions about the cost of replacing a wheel bearing, or if you need to schedule a repair, give us a call today at Chester River Auto Repair!

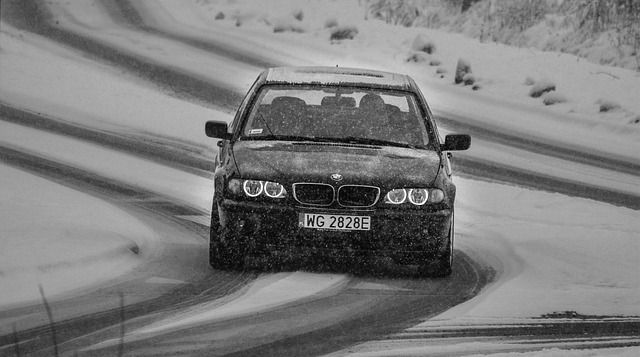
Woman driving a car. Free public domain CC0 photo. Winter wreaks havoc your vehicle. From temperature drops that affect tire pressure to ice and salt, which can damage a vehicle’s exterior, winter weather causes a lot of wear and tear on cars. That’s why it’s so important to winterize your vehicle. Preparing your car for winter ensures, first and foremost, safety. After winterizing your vehicle, you can improve stability, visibility, and stopping power. Also, a few winter prep steps can help improve comfort and performance through the cold days of winter. Thinking about getting your car ready for winter? With the snow right around the corner, now is the perfect time to follow these ten tips for winterizing your vehicle. Check Tire Tread Worn tires are one of the leading causes of winter automobile accidents. Old, worn-down tires increase stopping time and reduce stability, which is especially true in icy conditions. Start by examining the tread depth. Service Your Battery Winter weather is your car battery’s worst enemy. In the dead of winter, cold air can drastically reduce the battery’s ability to generate power. That’s why hard starts are more common in cold weather. When the temperature is below freezing, the energy in a fully charged battery drops by half. Similarly, you’ll likely be running the heater and defroster, which puts more strain on the battery. Clean Battery Terminals Corrosion on the battery terminals causes a lot of problems in the winter. Starting problems, for example, can be caused by this issue. Plus, significant corrosion can impede the charging system’s ability to recharge the battery fully. Check Your Brakes On icy roads, you rely on your brakes to stop. That’s why this is a critical car winterizing step. Inspect the brake pads and rotors; they should be changed if you notice wear. One telltale sign of worn-down brakes is brake noise; if you notice wheezing, grinding sounds, or chirping, it’s best to have your brakes checked. Winterize Your Fluids The cold weather affects all your car’s fluids, from the motor oil to the wiper fluid. A winter car tune-up should include: Oil Change – Motor oil thickens in cold weather, which can cause several wear-and-tear and performance issues. Adding new winter-blend oil will ensure it’s the right viscosity for winter. Anti-Freeze Check – Anti-freeze is a mixture of water and anti-freeze fluid, usually in a roughly 50:50 ratio. If there’s too much water in the mixture, you can run into issues with freezing. Wiper Fluid Replacement – Replace your wiper fluid with a blend that contains anti-freeze. A -20-degree wiper fluid is best. Brake Fluid – Check brake fluid levels and top off if necessary. Replace Your Wiper Blades Examine your blades for wear and tear. If you notice cracking, or if your blades leave streaks in the rain, it’s time to replace them. Heating and Cooling Check-Up You rely on the heater and defroster in winter. That’s why you must make sure the system is ready for the colder weather. Take your vehicle in for a heating system tune-up. Lubricate Exterior Components In cold weather, freezing water can seep into locks, door jambs, and window tracks, creating minor annoyances like slow-moving windows. Over time though, these problems can stress window regulator cables, weather stripping, and locks, resulting in costly repairs. Before winter, lubricate and protect these components using a dry lube or silicone spray. Prep the Paint Winter weather dulls the paint’s shine and can eat into the clear coat. Road salt exacerbates the problem, leaving your car’s exterior susceptible to oxidation and rust. These are just a few of the ways that you can prepare your vehicle for winter. If you have more questions, give us a call at Chester River .
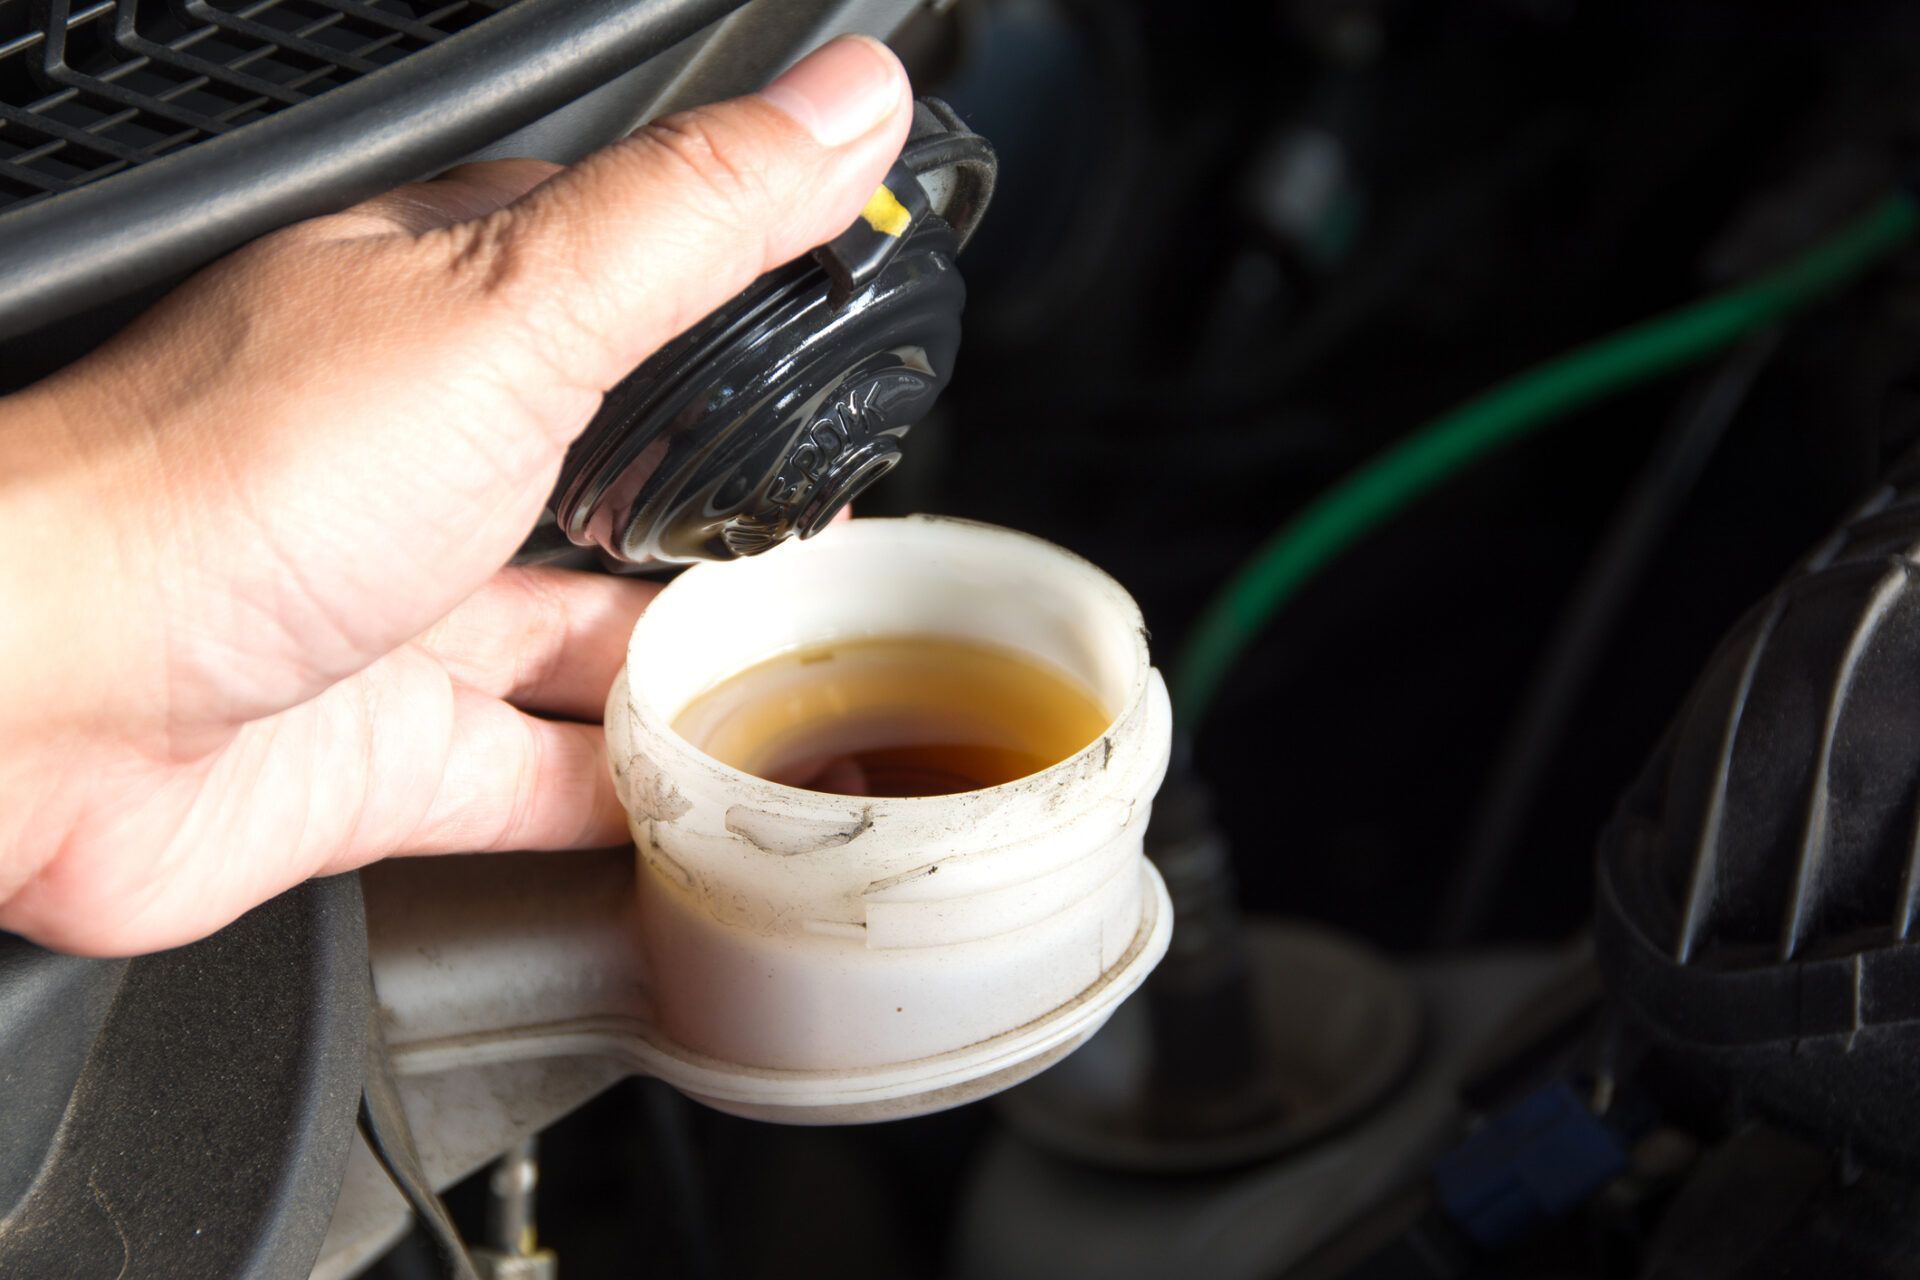
Check Car's Oil Level Engines are made up of many moving parts, and those parts need to be properly lubricated to avoid damage. Oil in the engine provides this vital function. Over time, that oil breaks down and becomes contaminated with dust, dirt and debris from the engine as well as the environment. When that happens, oil can’t properly do its job. A recent study by the Car Care Council stated that 22% of vehicles have low or dirty engine oil. Proactively changing a vehicles’ oil and filter will help the engine continue to work at its best and prevent costly repairs to drivers down the road. Compare the average cost of a years’ worth of oil changes ($120) to the cost of not proactively maintaining a vehicle’s engine ($4,000)* and the benefit to both wallets and vehicle well-being is clear. Maintains engine lubrication. Imagine all the moving parts, pistons, valves, and other engine parts moving at high rates of speed under the hood of a car. These components create heat and will wear down the engine dramatically without proper oil lubrication. Make sure to refer to the owner’s manual to see what specific weight and grade of oil the vehicle requires and ensure it is kept at the recommended fill volume. Cools engine components. Moving parts that lack proper lubrication create friction, which in turn creates heat. Maintaining clean and sufficient amounts of oil is the perfect solution to prevent too much friction and over-heating of the engine. Removes engine wear particles and sludge. Dirt particles are deadly to engines. Over time, dirt can cause corrosion and decrease the life of an engine. Also as time goes on, oil breaks down and turns to “sludge.” The name of the game is to keep the engine clean. Routine oil and filter changes help remove particles and sludge and keep engines at peak condition. Improves gas mileage. Poor engine lubrication can lead to increased fuel consumption, so make sure there is enough clean oil in the engine. The U.S. Department of Energy says that with routine changes and the right kind of oil, gas mileage can be improved over time by 1-2%. That doesn’t sound like much of an improvement, but for the average car, it leads to savings of an entire gallon of gas for a year! Promotes vehicle longevity. Plain and simple, routine maintenance makes your vehicle last longer. Buildup from dirty oil robs a vehicle’s fuel economy and power and makes internal components work harder. An engine that works too hard will end up having more problems down the road as well as a shorter life span. According to Kelley Blue Book, car valuation increases at resale time if regular maintenance has been upheld. If you need to schedule your oil change, give us a call at chester river and we can get your vehicle in and out and get you on the road with peace of mind.

Driving Through Puddles Can Leave Damaging Effects Crazy weather and storms often leave massive puddles that can actually cause damage to your car. Grinding Your Car’s Gears To avoid damage from driving in puddles, staying out of storms altogether is the best choice. If you have a garage or car port, you should park your car inside there. Your second best option should be to park away from trees that can get blown over and damage your car. If you must drive during a storm, remember that deep puddles of standing water can cause damage to your vehicle. The water can even damage your transmission by causing your gears to slip. Stopping is as Important as Going If your rotors appear to be hot, water exposure can warp them. Your car will begin to vibrate when you apply the brakes. Also, water may get into the brake lines and cause brakes to fail. Water in the brake lines may not show up right away. Try pumping your brakes after rolling through deep water to squeeze water from the pads. Interior Damage Water can seep into the driver and passenger compartment, and this can potentially ruin your upholstery, carpets, and foam in the seats. Your vehicle’s manufacturer may also have installed computers in the floorboards and under the seats, and water damage to those components can also cause all kinds of electrical and electronic issues. Flood Damage Can Be Sneaky Flood damage to your car may not appear right away. If flooding has damaged your vehicle, do not start your engine. Starting the engine can cause even more damage. Having your car towed to an auto repair shop for a thorough inspection is the best thing you can do if your car happens to stall because of standing water. Just don’t start it! Follow Up With Your Insurance Company If your car has been flooded, checking with your insurance company to determine your policy covers should be one of the first calls you make. We know that there are times when driving through a puddle is unavoidable. If your car has been in flood, call the German Imports Car Care technicians for all of the comprehensive maintenance and auto repair services you need.
Driving Through Puddles Can Leave Damaging Effects Crazy weather and storms often leave massive puddles that can actually cause damage to your car. Grinding Your Car’s Gears To avoid damage from driving in puddles, staying out of storms altogether is the best choice. If you have a garage or car port, you should park your car inside there. Your second best option should be to park away from trees that can get blown over and damage your car. If you must drive during a storm, remember that deep puddles of standing water can cause damage to your vehicle. The water can even damage your transmission by causing your gears to slip. Stopping is as Important as Going If your rotors appear to be hot, water exposure can warp them. Your car will begin to vibrate when you apply the brakes. Also, water may get into the brake lines and cause brakes to fail. Water in the brake lines may not show up right away. Try pumping your brakes after rolling through deep water to squeeze water from the pads. Interior Damage Water can seep into the driver and passenger compartment, and this can potentially ruin your upholstery, carpets, and foam in the seats. Your vehicle’s manufacturer may also have installed computers in the floorboards and under the seats, and water damage to those components can also cause all kinds of electrical and electronic issues. Flood Damage Can Be Sneaky Flood damage to your car may not appear right away. If flooding has damaged your vehicle, do not start your engine. Starting the engine can cause even more damage. Having your car towed to an auto repair shop for a thorough inspection is the best thing you can do if your car happens to stall because of standing water. Just don’t start it! Follow Up With Your Insurance Company If your car has been flooded, checking with your insurance company to determine your policy covers should be one of the first calls you make. We know that there are times when driving through a puddle is unavoidable. If your car has been in flood, call the Chester River technicians for all of the comprehensive maintenance and auto repair services you need.

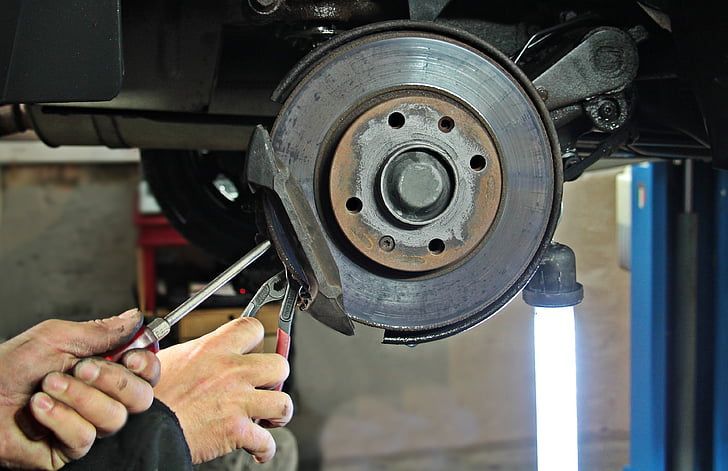
Have you ever been driving down the road and you started to feel you steering wheel start to shake when you get up to a certain speed? Or when you apply the brakes, you can feel the whole car shaking and you can feel it through the steering wheel? This can be very concerning for most people and for good reason! This is an early indication of a few problems that you need to get fixed before the issue gets worse and more expensive. Warped Brake Rotors. This is the most common reason as to why your car will start to shake when you are driving or when applying the brakes. As the problem continues to get worse and left unsolved you will notice how your car will start to shake more violently. The reason this happens is because the surface of your brake rotor gets worn down over time and eventually becomes too thin. This is a pretty easy fix, however, left for too long and the problem can start to effect other aspects of your vehicle. Squealing Or Grinding Have you ever heard a high-pitched squealing sound when you apply your brakes? Squealing or screeching is a sign your brake pads are wearing down and need replacing. Deep, low grinding sounds can mean your pads have worn away so much that there’s metal-on-metal contact. This can significantly damage your vehicle, so get your brakes checked straight away if you hear this noise. Signs You Can See One way to know the condition of your brakes is to look at them. You can check the thickness by peering through the spokes of your wheels, where you should see your brake pad pressed against the metal rotor. If your pads are thinner than a quarter of an inch (around 3mm), it’s probably time to replace them. Response Time If your brakes do not feel like they’re responding well when you put your foot down, be sure to get them inspected. This is called ‘brake fade’ and happens as your brakes wear down and become less effective over time. If the pedal feels like it’s sinking towards the floor or you have to press it right down before your brakes engage, your brake fluid might be leaking. Keep an eye out for a small puddle of fluid on the ground when your car is parked, which also indicates a leak. This problem could also be caused by an air leak in the hydraulic system, or your brake pads might need replacing. Pulling Or Vibrating When you notice a change in how your brakes feel, that’s a sign they need attention. If your car seems to pull to one side as you brake, that indicates your brakes are wearing unevenly. They might need adjusting or replacing, so get them checked by a mechanic. Only was to get this corrected is to bring it in so we can get it realigned for you and get you back on the road! Give us a call today atchester river to have your brakes replaced.
Maybe you want to bleed your brakes because you changed your pads and rotors and want to get the air bubbles out. Maybe you’re like me, and you changed not only the caliper but also the brake line. In any case, the whole point of bleeding your brakes is to get the air out of the system, and that’s what we’re going to do now to bleed your brakes on your own. In this article, I will show you how to bleed your brakes by gravity alone. Gravity bleeding is a process in which the brake lines are manipulated to remove trapped air bubbles. Gravity bleeding is an effective method of releasing air bubbles in the brake lines, and the result of this process is always 10/10. Gravity Bleed Brakes Gravity Bleeding is a method in which new fluid is introduced into the system while the old fluid is drained. The idea is that the incoming liquid expels any air bubbles that may form. As you probably know, the brake fluid needs to be changed approximately every two years because brake fluid draws moisture from the air. If the brake system is heavily loaded from prolonged driving, it heats up, and the heat is transferred from the brake pads to the brake pistons and from there to the brake fluid. The water contained in the brake fluid begins to boil much earlier than the pure fluid would. This process produces vapor bubbles, which cause more extended pedal travel and a reduced braking effect. This happens because the water in the brake fluid is compressed in the brake lines. The driver can determine this quickly because the brake pedal feels very “spongy” at this point and can be depressed without any braking effect. Can I Do Gravity Bleed Brakes Alone? If you don’t have a helping hand, you can still bleed the brakes in most cases. So, yes , for this, you need to open your bleeder and let gravity do its job. Tools Do I Need To Bleed Brakes: Masking tape for the safety issue A small pair of vise grips An open-end wrench An empty quart jar One quart brake fluid/ oil 5 feet of 3/16-inch plastic tubing Automotive jack and four jack stands Hammer How to Gravity Bleed Brakes Alone If you proceed carefully, you can bleed the brake system yourself. However, if you are in any doubt, it is best to leave it to the professional. After all, brake failure can quickly lead to an accident with damage to the sheet metal and, worst case, injury. The top priority is cleaning in the form of lint- and dirt-free gloves and rags so that no foreign bodies can enter the brake system and cause damage. Therefore, the separation points must be hermetically sealed immediately after each work step. Step 1: Raise Your Vehicle Above The Ground First, you need to raise your car. Please make sure the vehicle is secure before working on it. Shaking it slightly, you can see if it is holding steady. Do not push too hard if the car is not stable, as the jack could slip and the vehicle could be damaged. When the car has been raised and is standing securely, you must remove the wheels. Use the wrench for this. Step 2: Find The Brake Fluid Reservoir Find and remove the top of the master cylinder reservoir. As a rule, cars have this reservoir which is light-colored with a black cap, and it is located in line with the brake pedal in the engine compartment. Step 3: Attach The Plastic Tubing You will need to start with the brakes located furthest from the master brake cylinder. These are usually the right rear brakes. Locate the brake line bleeder screw and slide the end of the clear tubing over the screw nipple. Dip the other end of the tubing into a container that is held above the fluid reservoir. This will prevent air from being sucked into the brake system. Step 4: Release The Air Bubbles Loosen the bleed nipple screw with the wrench at approximately ¼ turn. While the hose is still attached, loosen the bleed screw. This opens the brake line and allows the fluid to flow. Since the brake fluid reservoir is higher than the bleeder screws, gravity may cause a small amount of fluid to flow into the hose when the bleeder screw is opened. This is a good sign of no obstructions in the fluid line. This process will take about 3 to 4 minutes, so you must be patient. To speed up the gravity bleed process, take a wooden handle or a rubber mallet and tap the brake calipers several times. Check your brake fluid reservoir; it should be filled appropriately. Step 5: Close The Bleeder And Replenish Brake Fluid Reservoir Close the bleeder. Before removing the clear tube, close the vent screw to prevent air entering. The bleeder screw does not need much force to close, and a quick tug should be sufficient. Brake fluid will come out of the hose, and you will have a rag ready. Check the brake fluid level in the reservoir. You will see that the level has dropped a little. Add more brake fluid to refill the reservoir. Do not let the brake fluid reservoir run dry. If air bubbles exist in the previous fluid, repeat the above steps until the fluid is clean and clear. Step 6: Bleed The Remaining Brakes Repeat this process for each other brake valve until all four are fully vented. Ensure the amount of brake fluid in the reservoir does not drop below ¼ cup, which could cause air to enter the brake system. Step 7: Test Drive And Troubleshooting It’s time for a test drive. Step firmly on the brake pedal to ensure it is nice and firm before starting the vehicle. At this point, it should feel almost like stepping on a rock. You may feel the pedal go up or down as the vehicle starts and the power assist starts. This is normal as the brake booster system amplifies the force you apply with your foot and transfers it through the hydraulics. Take the vehicle for a drive and slow down with a firm application of the brake pedal to test its work. The brakes should have a very quick and sharp response to your pedal applications. If you feel that the pedal is still too quiet or the braking power is insufficient, you should ask a local expert for help. If you have any more questions on how to bleed your brakes or if you’d like to schedule an appointment to have your brakes, give us a call at hybrid repair san diego

Aside from dashboard warning lights, smells are among the most prominent tell-tale signs that there could be something wrong with your car. From burning rubber to rotten eggs, cars produce a wide range of bad odors when there’s a fault, so you should always pay attention to how things smell when you first switch on the ignition and when you’re out on the road. Just as with visual checks, being able to identify different smells and their associated problems can make it easier to diagnose faults with your car. Detecting these warning signs early could prevent major failures and breakdowns, potentially saving you money on pricey repair bills. So, what smells can signal there’s something wrong with your car? Here we take a look at 10 odors you should never ignore. 1. General Burning Smell Although car engines are designed to run at high temperatures, they should never emit a burning smell. If your engine smells of burning or smoke, there are two possible reasons for this: it’s overheating or there’s a problem with the oil. Generally if it’s overheating, you’ll know about it because a warning light should appear on the dashboard. Pull over immediately if you suspect overheating, or you could cause severe damage to the engine. 2. Burning Paper Smell Burning paper is a distinct smell, so this one should be easy to remember. If it suddenly smells like there’s a paper fire in your car’s cabin while you’re driving, there’s a good chance it’s coming from the clutch, the facings of which do contain paper. Clutch smells are quite common and don’t always mean there’s a serious fault that needs repairing. Most often they’re caused when a driver ‘rides’ the clutch, which means half depressing the pedal. This causes the clutch to slip, overheating its facings and causing a paper burning smell. While driving, try not to overuse the clutch pedal and get in the habit of moving your gear-changing foot away from it when you’re cruising; this helps prevent riding. If the paper burning smell doesn’t go away, you may need to replace the clutch facings and have the gear system inspected. 3. Burning Rubber Smell The smell of burning rubber may be most associated with tires, but unless you’re driving like a Hollywood stuntman it’s rare that the tires would produce such a smell. Instead, for everyday drivers, the odor is more likely coming from the engine bay – particularly from the belts and hoses. Engines rely on a series of rubber belts and hoses for everyday driving. When one of these fails or becomes too tight, it can cause a burning rubber smell – a recognizable odor you should never ignore. 4. Rotten Eggs Smell Before you go accusing your front-seat passenger, it’s worth remembering that that rotten egg smell could be coming from your car, more specifically from the catalytic converter. These systems, located in the exhaust of some cars, are designed to convert hydrogen sulfide into sulfur dioxide. When they fail sulfur can escape, and that’s what produces the strong rotten eggs smell. Granted, not many modern cars still have a catalytic converter, so it’s unlikely that you’ll ever experience the unpleasant odor when such a component fails. But if your car does have a cat and it’s fairly old, this is the part to check if you suddenly smell bad eggs in the cabin. 5. Sweet, Syrupy Smell This unusual odor is one to look out for when your car is parked or when you’ve just switched on the ignition. If you notice a sweet, syrupy smell, there’s a good chance the cooling system is leaking, with coolant/antifreeze having escaped from the sealed system. Coolant/antifreeze contains ethylene glycol, a chemical compound known for its sweet smell. When the cooling system develops a leak, the fluid can drain through the car’s undercarriage and drip on to the road, causing a sweet smell that can be surprisingly powerful and difficult to miss. 6. Fusty, Mildew Smell When warmer weather arrives in spring, you might find yourself reaching for the air-conditioning switch for the first time in months. But wait – what’s that smell? Over time, air-conditioning systems can get clogged up with dust, dirt and debris that can lead to bad odors in the cabin. Not only that, but moisture in the system can also cause the onset of mold and mildew – bad news for the air quality in your car. 7. Fumes/Exhaust Smell If you notice fume-like smells while driving, particularly when you’re idling or driving slowly, pull over immediately and exit the car. The smell of fumes could indicate a leak in the exhaust, meaning dangerous levels of carbon monoxide could be entering the cabin. Exhaust leaks are often caused by corrosion, with rust eating away at exposed pipework and eventually causing small holes or cracks. When this happens, fumes that are supposed to divert through the tailpipe instead linger under the car, rising through the floor and into the cabin. If you notice the smell of fumes in the cabin and find a leak in the exhaust system, reach for Holts Gun Gum. Our innovative exhaust repairs system provides a permanent, DIY seal for leaking exhausts, helping you save money on pricey repair costs. 8. Burning Plastic Smell The acrid smell of burning plastic is hard to miss, so if you smell something similar while driving, pull over immediately to perform a few visual checks. The first thing to check is the undercarriage. Sometimes litter from the road (like plastic bags) can get caught under your car and melt due to the heat of the exhaust. If this happens, try to safely remove as much of the material as possible before setting back off or you could risk a fire. 9. Petrol or Diesel Smell One of the biggest red-flag odors you might smell while driving is fuel. If you get a whiff of petrol or diesel, either while your car is parked or when you’re on the move, there could be a fuel leak – a dangerous fault that you should never ignore. Fuel leaks are rare on modern cars, and only really happen when the seals around the fuel lines perish over time. But if you notice a sudden change in fuel level or a strong smell of petrol or diesel, stop, switch off the ignition and call for roadside assistance. 10. Burning Hair Or Burning Carpet Smell Oddly enough, overheated brakes smell like burning hair or carpet, so that should help you diagnose brake trouble out on the road. Brakes can start to overheat with aggressive force or overuse, as is common when driving down a long steep hill. The worrying thing about bad brake smells is that when they overheat, they no longer work like they should. So, if you smell burning hair when driving downhill, switch to a low gear and use engine braking to reduce the load on your brakes. Often you may notice the distinct smell of brakes during normal driving. This could be because of a faulty handbrake that isn’t releasing properly or very worn brake pads. Either way if you notice a problem with your brakes, have them checked immediately. So, there you have it, 10 smells you can’t afford to ignore while driving. With routine maintenance, it’s easy to keep your car in good working order and avoid some of the problems mentioned in this guide.

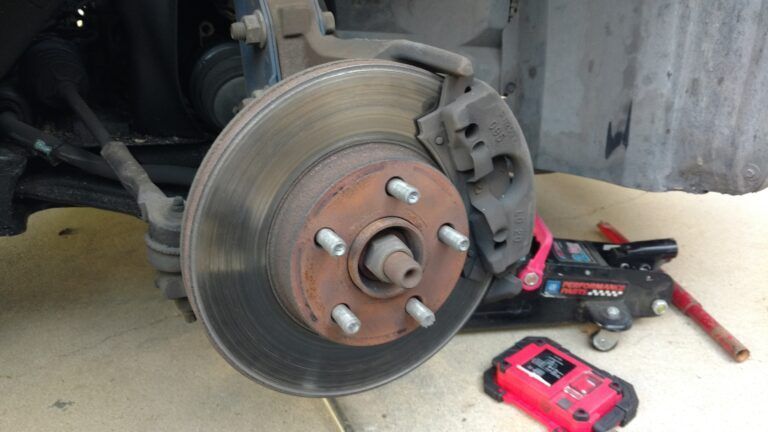
No matter how much you take care of your car there are always some maintenance problems that can unexpectedly occur. However, only a calm and peaceful mind can help you in such situations and it is wise not to let haste make the problem even worse. Certain parts can land you in trouble at an unexpected time and most of these parts are directly related to the proper functioning of a vehicle. One such part that can unexpectedly cause trouble while doing normal maintenance work is the brake piston calipers. The brake piston calipers are located inside the brake calipers, and they push the brake pads onto the rotors whenever the brake pedal is pressed. The calipers move back to their original position as soon as the brake pedal is released. Brake pads need to be replaced whenever they are worn out and there is a good chance that you might have to face stuck brake pistons while replacing the pads. There are a variety of reasons why brake pistons get stuck those reasons are mentioned below. Brake Caliper Piston Won’t Go Back In Causes BRAKE DUST Brake pads release dust/soot when they rub against the rotors, overtime the pistons get covered with the soot and get stuck. The solution for this problem is simple, you just have to clean the dust with a soft brush, or a clean cloth, and your brake caliper pistons might go back in. However, you may have to apply a little pressure using a suitable clamp, or else they may not push back in because of insufficient pressure. Also, keep in mind that the front and rear brake caliper pistons have different mechanisms. Rear pistons need to be turned and pushed in simultaneously using a tool called wind-back tool. Worn Out A Brake Hose Another reason why a brake piston caliper won’t go back in is because of a worn-out brake hose. Brake hoses handle a lot of pressure from the pressurized brake fluid and over time they start to break internally. To check for this fault, first, apply pressure on the piston by a screwdriver and see if the fluid level rises in the reservoir, if it doesn’t then you need to loosen the bleeder valve. Apply pressure on the piston using a screwdriver and if the fluid comes out of the valve and the piston starts moving then it is the brake hose that has decomposed. Changing the brake hoses on all the sides will be a suitable thing to do since all of them would have aged by that time. Corrosion Corrosion is one of the worst enemies of many car components and it can also freeze the brake pistons. Brake fluid is hygroscopic in nature and over time it can absorb a lot of moisture from the atmosphere that will corrode the internal components of a braking system and will eventually freeze them. That is why it is always advised to change the brake fluid every 50,000 km or 3 years (whichever comes first), and make sure that the recommended type of brake fluid is being used. Necessary precautions You should always exercise necessary precautions while working on the brakes. Don’t leave the brake caliper hanging as it strains the brake lines. Always makes sure that the brake fluid does not come in contact with the car’s paint as it can damage it and never leave the brake fluid reservoir open for long since it absorbs moisture. If all of the above methods don’t work, then your car’s brake calipers need to be replaced. If you are having issues with your calipers, give us a call today at Chester River.